
Last updated: March 2026.
March 2026 Update: Amazon has basically overhauled how ungating works. The old AI bots are gone and it looks like real people are now reviewing your requests. Most brands have also moved to 100 units instead of 10. I’ve updated this guide to cover all of it.
If you want to know how to get ungated on Amazon UK, you’re in the right place. If you’ve been selling for more than about five minutes, you’ve probably run into a product you wanted to sell and been hit with that lovely “Apply To Sell” message. Welcome to the world of ungating. It’s one of the most common things I get asked about from newer sellers.
I’ve been through the ungating process more times than I can count over the past few years, and I’ve gone from finding it frustrating to just seeing it as part of the game. Once you understand how it works and what Amazon actually wants from you, it becomes a lot less scary.
This guide covers everything. The basics of how ungating works, what documents you need, the new 100-unit requirement that’s caught a lot of people off guard, and some legitimate tricks that can save you time and money.
I remember back when I first started doing Amazon, ungating was easy. It only took 2-3 attempts to get ungated. However, times have changed. I remember having this one brand, Lenovo. This was my nemesis brand. It took me 7 attempts to ungate despite the fact I had an invoice from Lenovo’s business website. Ah, how times have changed.
Now 7 attempts is rookie numbers. These days it can take 20-30, even 50+ attempts sometimes to get a premium brand ungated.
However, there has been a major update to ungating on Amazon. As of March 25th 2026, it looks like Amazon has completely changed how this works. The old system where you’d submit the same invoice 50 times and hope the AI bot would finally accept it seems to be gone. It looks like real people are now reviewing your requests, and from what I’ve been seeing (from my own experience and from the overall Amazon community), the number of attempts has dropped massively. It’s still early days so I can’t give you exact numbers yet, but it’s looking a lot more like the old days where a few solid attempts with a proper invoice gets it done. I am still awaiting official word from my Amazon contacts.
As you can probably tell, Amazon is always changing how the ungate system works. I always keep this article up to date with the latest information.
I also covered this topic in a recent live stream. Watch it below.
Table of Contents
What Is Ungating and Why Does Amazon Do It?
So basically, “ungating”, also known as brand approval, is the process of getting Amazon’s permission to sell in certain restricted categories or brands. Categories like health and beauty, grocery, and topicals are gated, and big brands like Nike, Versace, Clinique, Bosch, Samsung, and loads of others require approval before you can list anything.
Amazon does this for a few reasons. They want to make sure the products being sold are genuine, they want to protect customers from dodgy sellers flooding listings with counterfeit gear, and they want to maintain some level of quality control. To be fair, it makes sense, even if it’s annoying when you’re the one trying to get approved.
The good news is that once you’re ungated in a brand or category, you tend to stay ungated. It’s a one-time process per brand or category, and it opens up a whole world of products that most sellers can’t touch. That reduced competition is actually one of the biggest advantages of going through the hassle.
Recently Amazon has been re-gating some people on certain brands. I suspect this is because of the new 100 unit ungating requirement.
It seems like the new update (25th March 2026) was a bit of a reset for some sellers who had ungated some brands with 10 units. Amazon now wants them to provide an invoice for 100 units.
Amazon’s New Ungating System (March 25th 2026)
On March 25th 2026, Amazon completely changed how to get ungated on Amazon UK. This has been a long time coming, because ungating has been broken for nearly a year. People have been trying to ungate brands 40 or 50 times and still getting rejected. The new system seems to have completely eliminated the AI bots that were auto-rejecting invoices, and Amazon has now brought in human teams to actually review brand approval requests properly.
This is a major update for all Amazon sellers, and to be honest with you, it’s really good news for us. It means our legitimate invoices from proper suppliers are now actually getting a correct evaluation from a real human, which they weren’t getting before.
On the flip side, they’ve also increased the requirements for many brands. A lot of brands that used to only need 10 units to ungate are now requiring 100 units.
In my opinion, this is Amazon professionalising the entire ecosystem and making sure that all sellers are serious sellers using proper sources to buy their products. It’s eliminating the side hustle element of Amazon a little bit. Basically, it’s removing the casual seller from the platform.
Don’t get me wrong, I still think you can do Amazon as a side hustle. But they have increased the barrier to entry, and that might put some people off. However, given the opportunity on Amazon, I still think it’s worth getting into it, even if the ungating requirements are a little bit harder now.
What Amazon Requires for Ungating
Before you can learn how to get ungated on Amazon UK, you need to understand exactly what invoice requirements Amazon is looking for. Get this wrong and you’ll waste time with rejections. Trust me, I’ve seen people submit the same incorrect documents 20 times wondering why they keep getting declined.
Here’s what Amazon typically requires for brand approval:
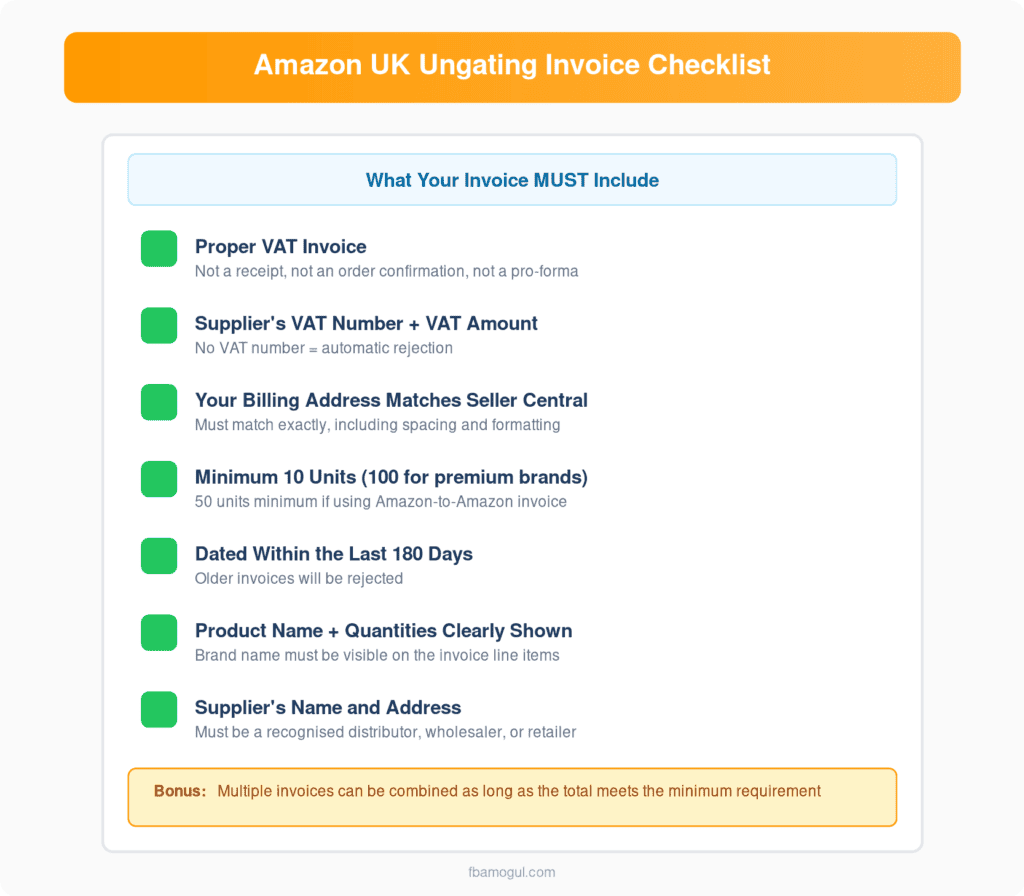
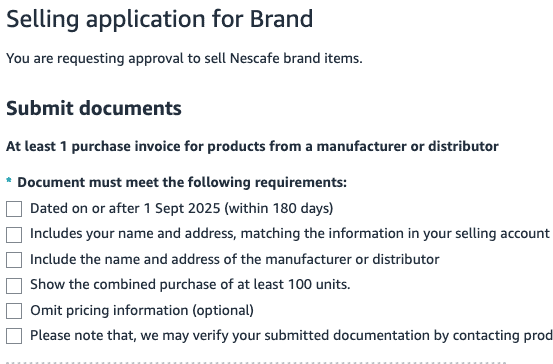
A proper VAT invoice. This is the big one. Amazon wants a purchase invoice. Not a receipt, not an order confirmation, not a pro-forma invoice. An actual invoice from a recognised distributor, wholesaler, or retailer. The invoice needs to clearly show the product name, quantities, the supplier’s name and address, and your billing address.
The invoice also needs to show the supplier’s VAT number and the VAT amount. If the supplier isn’t VAT registered or the invoice doesn’t show VAT, Amazon will reject it.
Your billing address must match your Seller Central address. This trips up more people than you’d think. The address on your invoice needs to match the business address on your Amazon seller account. Ideally they should match identically, including spacing and formatting, because Amazon’s bots sometimes auto-decline applications where there are minor differences.
A minimum of 10 units. For most brands and categories, you need to show you’ve purchased at least 10 units. If you’re using an Amazon-to-Amazon invoice, that minimum goes up to 50 units. Some bigger brands now require 100 units (more on that below).
The invoice must be dated within the last 180 days. Don’t try submitting an old invoice from a year ago, Amazon won’t accept it.
Multiple invoices can be combined. You don’t need all 10 (or 50 or 100) units on a single invoice. You can combine multiple invoices as long as the total adds up to the required amount.
A big tip that I can give you as well is to almost overwhelm Amazon with evidence. This means giving them a photo of the actual items in your possession, a screenshot of your bank statement showing the transaction for the ungate, and any other evidence you can provide for the Amazon employee. You could even supply a screenshot of the Companies House page for the company you bought it from to show it’s a legitimate supplier.
How to Get Ungated on Amazon UK: Step-by-Step
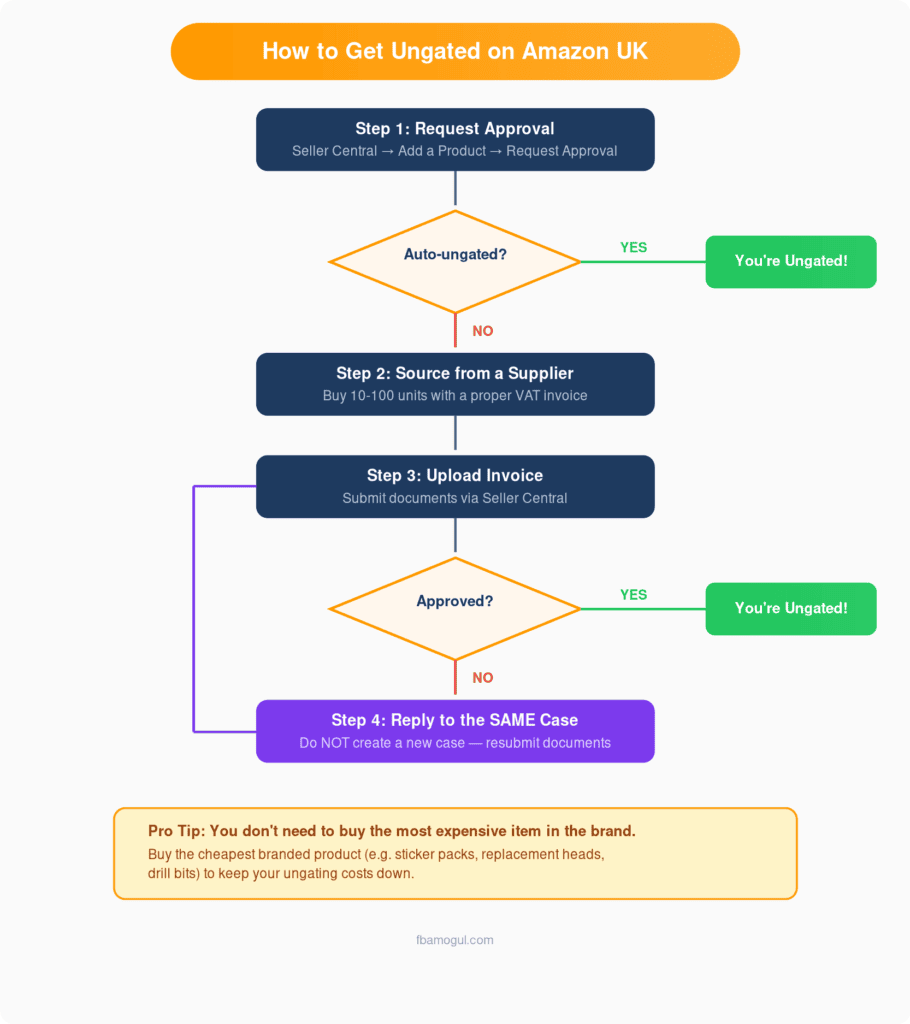
Right, here’s how you actually get ungated on Amazon UK:
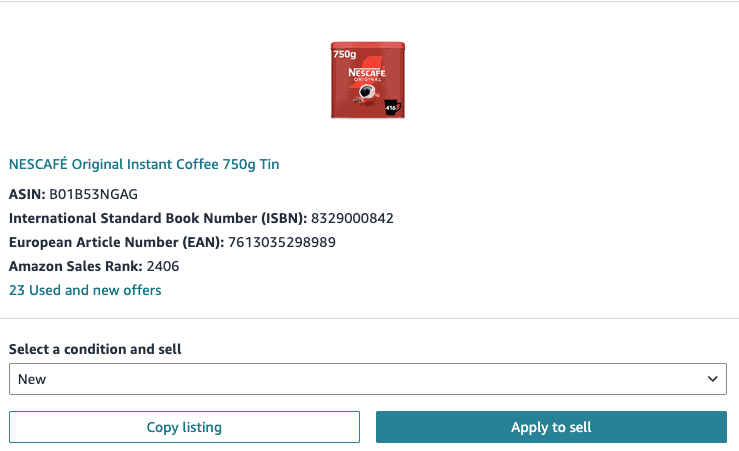
Step 1: Check if you can auto-ungate first. Before buying anything, go to Seller Central, navigate to Inventory → Add a Product, search for the product you want to sell, and click “Request Approval.” Sometimes Amazon will just let you through without any documents. This happens more often than you’d expect, especially if your account has decent metrics and some sales history. Always try this first. It costs nothing.
While I am a huge fan of SellerAmp and other tools, do not use these to try to request approval. You are actually hurting yourself by missing out on auto-ungates.
Step 2: If auto-ungating fails, you’ll see “Submit Documents.” This is where you need the invoice. Don’t panic, this is completely normal and it’s just part of the process.
Step 3: Source your products from a recognised supplier. Purchase your units from a legitimate distributor, wholesaler, or recognised retailer. Make sure the supplier provides proper invoices. If you’re unsure whether a website offers proper invoices, tools like OA Hero have an extensive database that tells you which sites provide invoices suitable for ungating.
Step 4: Upload your invoice and submit. Follow the prompts in Seller Central to upload your documents. Make sure everything is clear and legible.
Step 5: Wait, then follow up. After submitting, monitor your email and Seller Central notifications. If Amazon requests additional information, respond promptly.
Step 6: If rejected, resubmit. This is where most people give up, and honestly, it’s the biggest mistake. If you get rejected, reply to the same case (do not create a new case) and resubmit your documents. I’ve had ungating requests take anywhere from 1 to 20+ attempts before getting approved. Oftentimes you’re submitting the exact same information over and over until it lands on the right person’s desk.
You cannot take no for an answer with ungating. Persistence is honestly the most important part of the whole process.
The Trick Most People Don’t Know About
One of the best tips for how to get ungated on Amazon UK without spending a fortune is you don’t need to purchase the exact item you’re trying to ungate. It just needs to be an item from the same brand.
So for example, if you want to sell a Nintendo Switch console but that’s obviously expensive to buy 10 of just for ungating, you could buy 10 Nintendo-branded sticker packs for a few quid each instead. Submit that invoice, get ungated in the Nintendo brand, and then you’re free to sell the Switch or anything else under Nintendo’s brand.
This works across the board. Want to ungate in Oral-B? You don’t need to buy 10 electric toothbrushes. Instead you can buy 10 packs of replacement heads from a recognised supplier instead (these are cheaper than a toothbrush). The point is to prove you can source genuine branded products from legitimate suppliers, not that you can afford to stockpile the most expensive item in the brand.
Other examples where I have bought cheaper items to ungate a brand:
Lego: I bought 10 mini figures from the Lego online store.
Philips: I bought a single pack of 12 halogen bulbs.
Makita: I bought 10 cheap drill bits.
You get the idea. It is what it is. Amazon just wants the paperwork to be right. Play the game smart and you’ll save yourself a lot of money.
Why Amazon Keeps Rejecting Your Ungating Requests
If you’re still getting rejected for brand approval even after the March 2026 changes, here’s what’s probably going on.
Even though Amazon has moved to human reviewers, they will still reject your request if something isn’t right with your invoice. It doesn’t matter if you’ve got a perfectly legitimate invoice from a proper supplier. If the details don’t match up, it’s getting rejected.
The most common reasons I see people getting rejected are:
- Your billing address on the invoice doesn’t match your business address on your Seller Central account.
- The invoice is older than 180 days.
- The supplier isn’t recognised by Amazon as a legitimate distributor.
- The quantities on the invoice don’t meet the minimum requirements (which for most brands is now 100 units).
- The invoice format isn’t right. Amazon wants to see a proper commercial invoice with company details, VAT number, line items, and quantities. A receipt from a retail shop isn’t going to cut it.
On top of all this, Amazon is now reportedly contacting suppliers directly to verify that invoices are legitimate. If your supplier can’t confirm the purchase when Amazon contacts them, your ungate request could be rejected. Worth noting that not all suppliers will respond to Amazon’s verification requests.
Before the March 2026 update, this process was basically a lottery. You were either being reviewed by a bot that would auto-reject over the tiniest detail, or by a virtual assistant who had about 10 seconds to review your entire request. That’s why people were having to submit 40 or 50 times for the same brand.
The good news is that the new system seems to be a lot fairer. Real people are actually looking at your invoices properly now, which means if you’ve got a legitimate invoice with all the correct details, you should get approved in far fewer attempts than before. But you still need to make sure everything is spot on before you submit. Don’t give them a reason to reject you.
New Seller? Read this!
If you’re a new seller wondering how to get ungated on Amazon UK, here’s something most people don’t realise.. Amazon’s system trusts established accounts way more than fresh ones.
From my experience mentoring hundreds of new sellers, the magic window is around 100 to 200 sales and roughly 3 months of active selling. Before that, Amazon is much stricter with ungating approvals. Your account just hasn’t built up enough trust yet.
So if you’re new, don’t waste time trying to ungate big brands straight away. Focus on selling anything you can that you’re already approved for, even if the ROI is low or you’re breaking even. The goal at this stage isn’t profit. The goal is building your sales history and proving to Amazon that you’re a serious, active seller.
Once you’ve hit that 100-200 sales mark and been active for a few months, go back and try ungating again. You’ll find the approval rate goes up significantly. I’ve seen this play out dozens of times with sellers I mentor. Someone who gets rejected 10 times in their first month will get approved first try three months later with the exact same invoice.
It’s frustrating, but it’s the reality of how Amazon works in 2026. Play the long game and it pays off.
Best Suppliers for Ungating by Category
A key part of how to get ungated on Amazon UK is choosing the right supplier.
Below are my recommended suppliers for ungating in a few specific categories. If you’re looking for a supplier that covers multiple categories (Health, Beauty and Household), Qogita is the answer for you.
Health and Beauty
Health and beauty is one of the biggest categories on Amazon. These suppliers provide proper invoices that Amazon accepts for beauty and cosmetics brands.
Qogita – Get £100 of your first order using code FBAMOGUL during signup
Very Cosmetics
Toys
Toys is a big one, especially around Q4 when demand goes through the roof. These suppliers will give you the invoices you need to get ungated in toy brands.
Office Supplies
Office supplies is one of the categories people forget about, but there’s decent money in it. These are good suppliers for getting your ungating invoices.
Household
Household products cover everything from cleaning supplies to kitchen bits. These suppliers are solid for getting ungated in household brands.
Qogita – New household category – Get £100 of your first order using code FBAMOGUL during signup
Grocery
Grocery is one of the most popular categories for Amazon sellers. These suppliers will give you proper invoices to get ungated in grocery brands.
Other Sources
Brand websites directly. Amazon has been accepting purchase invoices from brand manufacturer websites. So if you want to ungate Nike, buying directly from Nike.com and using that invoice has been working. This doesn’t always work, but it’s currently a valid method.
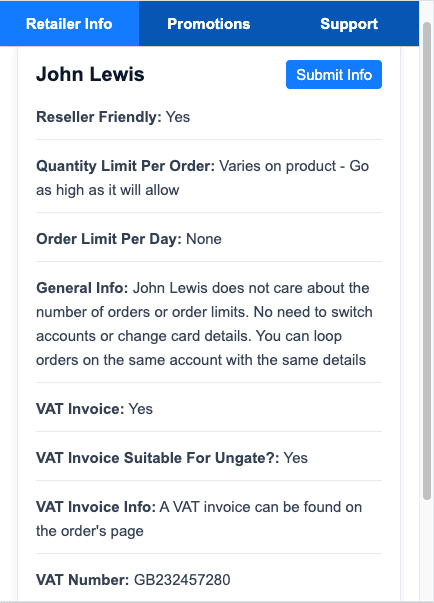
UK wholesalers and distributors. The traditional route. Open an account with a wholesaler, purchase your units, and use their invoice. This takes more effort upfront but gives you a reliable sourcing relationship going forward.
Ask other sellers. Before ungating a brand, ask other sellers in communities like my Discord which sites they’ve used successfully. Certain retailers are known for having higher acceptance rates on Amazon.
The 100-Unit Ungating Requirement (2026 Update)
You may have noticed recently that a lot of bigger, well-known brands now require 100 units to get ungated on Amazon UK. Brands like Bosch, Samsung, and other major names are no longer 10 units, which at first feels like bad news, especially for newer sellers working with limited capital.
Committing to 100 units can sound expensive, but when you zoom out and look at the bigger picture, this shift actually creates opportunity rather than removing it.
Why Amazon Has Moved to 100 Units (And Why That’s Good News)
Amazon is raising the barrier to entry, and I think that’s a good thing. They want to make sure sellers are running proper businesses, not just treating it as a quick side hustle. The ungating process forces you to prove you can source genuine products from legitimate suppliers, which protects the platform’s reputation and keeps dodgy stock off listings.
Yes, it’s more work for you upfront. But once you’re in, you’re competing against fewer sellers who’ve also done the work, which means healthier listings and better margins for everyone.
I have actually noticed fewer sellers on some of the bigger brands these days and it’s wonderful. During Christmas 2025 I was on quite a few premium fragrance listings where there was far less competition because the 100-unit ungate is a huge barrier to entry.
I totally understand that when you’re new and have a limited budget, the idea of spending £1,000 or more to ungate a brand like Paco Rabanne can seem impossible. All I can say to that is you will get there eventually. You need to start with the millions of other brands that are easier to sell, keep building your capital and your business, and you will get there. Remember, Amazon is a serious business that can be life changing, but no one ever said (or they shouldn’t have) that it’s easy or fast.
100 Units Doesn’t Always Mean Massive Money
A lot of people assume 100 units automatically means a huge spend, but that’s not always true. This is where the trick I mentioned earlier becomes even more valuable.
Many big brands sell smaller accessories, consumables, or low-cost items under the same brand name. Instead of buying 100 units of a £50 product, look for branded items that cost a few quid each. You might spend £200-300 getting ungated in a brand where the products you actually want to sell have 40-50% ROI and much less competition.
Think of it as an investment. You’re unlocking access to strong, reputable brands that can generate profit long term. The upfront cost pays for itself pretty quickly when you’re selling in a healthier market with fewer competitors.
Don’t Ungate Brands Just for the Sake of It
This is a mistake I see all the time, especially with newer sellers. They get it in their head that they need to ungate as many brands as possible, so they go on this mad ungating spree, spending money on invoices for brands they have no intention of actually selling.
Don’t do that. Only get brand approval when you’ve found a specific deal that makes money. If you’ve found a product on Keepa that looks profitable, the margins stack up, the competition is reasonable, and the only thing stopping you is that the brand is gated. That’s when you ungate. Not before.
There’s no point spending £200 ungating Samsung if you haven’t actually found a Samsung product worth selling. You’re just tying up capital for no reason.
The way I do it is simple. I find the deal first, check everything looks good, and if the brand is gated, I go through the ungating process. The deal is what drives the decision, not some checklist of brands I want to be ungated in.
Tools That Help With Ungating
OA Hero is really useful here to get ungated on Amazon UK. It has an extensive database of websites that tells you whether they offer proper invoices, which brands you can ungate from which suppliers, and a whole load of other information that saves you time. I built OA Hero partly because I was fed up of the trial and error involved in figuring out which sites work for ungating.
Beyond that, Keepa is essential for checking whether the products you’re buying for ungating purposes will actually sell afterwards. There’s no point ungating a brand if you can’t make money selling the products. Always check the Keepa graph and competition before committing money.
Common Mistakes to Avoid
Submitting receipts instead of invoices. This is the number one reason for rejections. A receipt from Tesco is not an invoice. Make sure whatever you submit is an actual invoice with your details, the supplier’s details, and VAT information.
Address mismatches. Even small differences between your invoice address and your Seller Central address can trigger auto-rejections. Double-check everything matches exactly.
Giving up too early. I cannot stress this enough. Ungating often takes multiple attempts. If you get rejected once or twice and give up, you’re leaving money on the table. The people who succeed at ungating are the ones who keep going.
Not checking what’s actually required. Different brands have different requirements. Some need 10 units, some need 50, some need 100. Always check the specific ungating page for the brand or category you’re targeting before buying anything.
Buying expensive products when cheap ones will do. As I covered above, you don’t need to buy the flagship product. Find the cheapest legitimate branded item and use that.
Final Thoughts
Getting ungated on Amazon UK comes down to three things: understanding what Amazon wants, getting your documents right, and being persistent when things don’t go through first time.
The shift to 100-unit requirements for bigger brands is actually a positive thing if you’re willing to play the long game. Less competition, healthier listings, and better margins. Don’t let the upfront cost put you off. Get it in, get it done, and unlock access to products that most sellers can’t touch.
If you’ve got questions about ungating specific brands or categories, drop into my Discord community where you can ask other sellers who’ve been through the process. And if you want more hands-on help, you can always book a free discovery call to chat about mentoring.
Hopefully this article has given you a good understanding of the requirements of Amazon for ungating, but also the underlying mechanisms that are happening at Amazon and why you are getting rejected.
Don’t take it personally. Just accept this is a part of being an Amazon seller and focus your efforts on sourcing, buying and growing your business.